Canadians produce 31 million tonnes of garbage each year, and nearly 58% of all food produced in Canada is lost or wasted. Food produced but not eaten ends up in landfills and creates methane, a powerful greenhouse gas harmful to the environment. As landfills across Canada overflow, finding ways to reduce our carbon footprint is essential.
One way to reduce food waste while producing nutrient-rich soil is by learning how to compost in an apartment or home. Starting a composting pile might seem daunting (especially if you don’t have a backyard). But the fertilizer from composting kitchen scraps can be well worth it and a great activity to try after working or spending more time at home.
Composting can be a self-sustaining project that’s easy enough to do in an apartment space. To help, our guide will show you the many benefits of composting and offer methods to ensure your space stays clean and tidy. Follow along or jump to our visual guide to get started!
What Is Composting + Why You Should Do It

Compost is a natural process through which organic material is converted into a soil-like product. So, you can also convert these materials into fertilizer rather than throwing kitchen scraps and other items such as newspaper and coffee filters away. The result is a dirt-like substance full of vitamins that help plants grow.
Food waste is a big problem—especially in large metropolitan cities. According to Environment Canada, biodegradable materials, such as food waste, comprise around 40% of all residential waste in Canada. Therefore, when tossed into landfills, organic waste can generate methane gas. You can avoid this if you compost. Composting not only puts less CO2 emissions into the atmosphere, but it can actually pull down what’s already been emitted and store it in our soil.

Composting also has many benefits that aren’t specific to helping the environment, such as creating fertilizer by composting, and allowing you to feed house plants and balcony containers. Hello, savings! This also reduces household waste and saves you a trip to the dumpster.
Have we convinced you to join team composting? Let’s go through what can and can’t be composted.
Everything You Need to Start

You’ll need four things for successful composting:
- Air: Supplying your compost with oxygen is important as organisms in your pile need to breathe air to survive.
- Water: Water helps with decomposition and keeping the pile’s temperature regulated.
- Brown materials: Brown materials like dead leaves and paper add essential carbon to your pile.
- Green materials: Materials like vegetables and fruit scraps add essential nitrogen to your pile.
There is no need to calculate how much nitrogen and carbon-rich materials you’ll need to ensure balance. When you’ve added too many green materials, the pile will be slimy and stinky, and when you’ve added too many brown materials, the pile will be dry and very slow to decompose. A good rule of thumb is that each time you add a batch of nitrogen-rich ingredients, add roughly four times that amount in carbon-rich ingredients.
What You Can (And Can’t) Compost

Composting animal products (pet droppings or dairy) or inorganic materials (plastic) can harm the other ingredients in your compost pile, attract pests, and produce foul odours. So to help, explore our list below for all the materials you should and shouldn’t compost.
Things You Can Compost
Various brown and green materials can be used in your composting pile.
Browns:
- Eggshells: Adding eggshells will provide calcium to your final compost.
- Vegetable scraps: Most vegetables and vegetable skins can be added.
- Nutshells: Breaking the shells into smaller pieces can help them decompose faster.
- Food-soiled paper goods: Greasy pizza boxes, paper towels and napkins can all be composted.
- Black and white newspaper (not coloured print): Newsprint paper is safe and free from glossy or coloured paper toxins.
- Cardboard: Any type of cardboard can be used in compost as long as it is broken into small pieces.
- Dead leaves: Dead, dried leaves are gold for composting because they add a high amount of carbon to the pile.
- Twigs and branches: Break branches and twigs into tiny pieces to add some wood and bark to your compost pile. Hay, straw and pine cones can also be composted.
- Wood shavings or sawdust: It’s fine to compost sawdust and wood shavings from real untreated wood.
Greens:
- Grass clippings: Grass clippings are excellent additions to a compost pile because of their high nitrogen content.
- Veggies: Add spoiled veggies to your compost pile by trimming them down. Cut big pieces down to smaller sizes that will decompose faster.
- Fruits: One great addition to your compost is unused fruit, although you’ll want to avoid adding peels.
- Tea and coffee: Loose leaf tea, tea bags, coffee filters and coffee grounds can all be composted. While coffee isn’t green, it adds nitrogen to your compost pile.
- Old flowers: Instead of throwing away dying flowers, give them new life by adding them to your compost pile. Avoid adding flowers that may have died from plant disease.
Things You Can’t Compost
Adding the wrong materials into your compost pile can create foul odours and attract pests and insects.
- Fat and cooking oil: You can only compost leftover cooking oil if it is in very small amounts and is a vegetable oil such as corn oil, olive oil, sunflower oil or rapeseed oil. Adding too much vegetable oil to compost slows down the composting process
- Citrus skins: Avoid adding banana, lemon or orange peels to your compost using worm bins. In addition, things like citrus pulp, skins, or any highly acidic fruit added in large quantities, can kill off your worms.
- Pet droppings: Dog waste in compost can carry several unhealthy parasites affecting humans and other animals.
- Coal ash: Coal ash can contain chemicals or metals that can compromise your compost and damage your plants or garden.
- Rotting or diseased plants: Avoid weeds and plants that died of unnatural causes as they could spread diseases in your soil.
If you use a worm bin in your apartment, avoiding meat and dairy products in your compost pile is best. Although you can compost these items, they can potentially harm your worms and generate a foul smell. If you use an outdoor composting bin without worms that you turn regularly, meat and dairy can be composted. You can also save your meat and dairy scraps for donation by storing them in your freezer.
How to Compost in an Apartment
If you’d like to help reduce emissions and your share of organic waste, apartment composting might be for you. These great methods to compost in an apartment are easy to learn and try.
Set Up a Worm Bin

Worm composters (yes, worms), also known as vermicomposters, are commonly used for indoor composting. Small, portable, fast worm bins quickly process household waste and produce nutrient-rich “worm tea” suitable for houseplants and planter boxes.
Another plus? No turning! Worm bins don’t require turning, usually required to decompose your waste since the worms do the work for you. Just remember to give the worms proper living conditions. Keep worm bins indoors or on a small balcony to ensure temperatures stay between 15°C and 26°C.
There are a few different methods for worm composting, such as setting up a DIY worm bin and using a ready-made worm composter.
DIY Worm Composter
For those who aren’t afraid of getting their hands dirty, building your own worm composter might be for you. Setting up a worm composter is easy and affordable, but it does require some maintenance.
Here’s a list of materials you’ll need to get started.
- Two plastic totes: Any plastic containers will do; just make sure one has a lid and that they are the same size to prevent worms from escaping once stacked
- A drill: You’ll need one that can drill one-eighth-inch-sized holes
- Bedding: Shredded newspaper (not coloured or glossy). You’ll need enough to fill your bin three inches deep and extra to add each time you feed the worms once a week
- Water: Enough to spray your pile to feel like a wrung-out sponge.
- Grit: 470 – 940 ml of gardening soil
- Red wiggler worms: The number of worms you’ll need will vary depending on the size of your bin, but you can generally start with 250
- Kitchen scraps: Collect enough kitchen scraps to make up one-third of your pile
Follow the instructions to create your own worm bin:
- Drill one-eighth-inch-sized holes every three inches along all four sides of the plastic containers. On one of the containers only, drill holes on the bottom of the container. From there, stack the container with the holes on the bottom of the other tote. This stacked model will allow drainage for the worms through the top container and ventilation holes through the sides.
- Fill one-third of the top container with shredded paper and spray the top of the paper with water until it feels like a wrung-out sponge.
- Next, add 470 – 940 millilitres of “grit” or gardening soil into the bin. Grit helps the worms’ digestion and acts as fungi and bacteria to help with decomposition.
- Next, add a pack of red wiggler worms. You can get red wiggler worms from online stores, at a worm farm or bait shop, and they tend to come in packs of 250.
- Add kitchen scraps to your pile. You can continue to add kitchen scraps once a week.
- Top with another third of the bedding material and spray again with water.
- Put the lid onto your container and store it in a location that’s not too cold but not too hot. Under your kitchen sink is great storage space.
Tips for DIY Composting
If you have the space, the best model uses two stacked totes. First, you always have a place to add kitchen scraps, even when one of the totes is full. Second, the worms will make their way between totes—crawling through the holes from one side. This way, you can access the tote with fresh, ready-to-compost scraps, and with a two-story model, you can harvest the finished compost from one tote without separating the worms from the soil.
Ready-Made Worm Composter
There are also many ready-made worm composters you can purchase. This option is great for anyone who isn’t interested in creating a worm bin themselves and wants a fast and convenient way to compost without the mess.
Below are a few options to try:
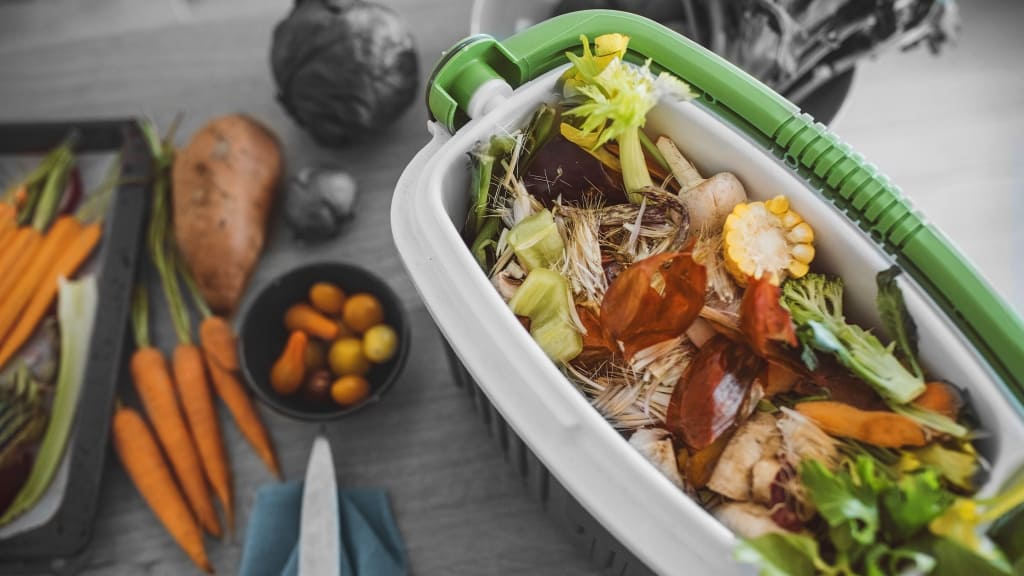
Whether you create a DIY worm composter or purchase a ready-made one, only add kitchen scraps to it once a week. Keep a container with a lid and a handle under the sink to store kitchen waste until you’re ready to transfer it to your composter. A stainless steel compost pail with a carbon filter or a ceramic model will reduce odours. But, you can use an old ice cream pail if you don’t mind the occasional smells. Chop up any large chunks before you toss them in.
Use Compost Tumblers
A compost tumbler is another option for composting in an apartment for anyone with a larger balcony or accessible outside area such as a communal area.
Compost tumblers are larger than worm bins and are the most efficient enclosed bin method. They are fully sealed to preserve the heat generated by your compost — increasing the speed of decomposition. They come with a handle to help aerate and mix the contents, and some work so quickly that they can process household waste in as little as 13 days.
Compost tumblers don’t smell or attract pests since they are sealed, making them well suitable for urban areas.
Resources for using compost tumblers:
Ferment Your Food Waste
Also called “Bokashi,” fermenting your food waste is a method that uses an inoculated bran. This dry mixture of bran, molasses and EM-1 microorganisms breaks down kitchen waste. There are many benefits to using the Bokashi method in your apartment because it’s less hands-on and does most of the work for you. You don’t have to keep in mind the balance of nitrogen and carbon as the activator mix hastens the decomposition process. Also, unlike traditional composting, you can use meat and dairy food scraps for fermentation.
Resources for using the Bokashi method:
Use Countertop Food Digesters
Countertop digesters are great for people with zero to minimal outdoor space. The resulting food waste is small and dry, so there is never a smell from your composter. Countertop food digesters are electricity-assisted and tend to be the size of a bread-maker appliance. An electric composter is an indoor compost bin alternative which uses aeration, heat and pulverization to reduce food waste volume, emissions and odour. The average food recycler is countertop-friendly, though certain models are about the size of a large garbage bin.
Collect and Donate Your Food Scraps
If you’re unable or uninterested in composting in your apartment, that doesn’t mean you can’t limit your contribution to reducing food waste. Try to collect and donate your food scraps to a local restaurant or community garden that composts, and remember to freeze your food scraps in a container weekly to prevent pests from getting to them. Many communities have curbside pickup options for collecting food scraps — if yours doesn’t, it might be worth looking into small businesses or farmer’s markets that might offer compost drop-off locations.
Below are a few resources for finding composting collection services near you:
- Compost Pickup Services + Locations (US and Canada)
- Organics Recycling Across Canada
- Composting Organics In Canada
- Composting By Households in Canada
Establish a Community Compost Bin
If at-home composting isn’t for you, try teaming up with other members of your community to start a communal compost program. Locations for community composters could range from community gardens to municipal property. Environmental organizations, such as Winnipeg non-profit Green Action Centre, offer tips and resources for people wanting to start their own community composting program.
Resources for starting a community compost site:
Ways to Compost During COVID-19
Even in a pandemic, there are ways to lower your food waste. Here are four ways to compost creatively during the pandemic:
Audit Your Fridge
Since food can easily get pushed to the back or forgotten in your fridge or freezer, regularly audit your fridge to ensure food that needs to be eaten is at the front and what needs to be tossed can be composted. Pull everything out and check the freshness of your items: Sort the produce that needs to be eaten from the ones that have more time, check your expiration dates on items that have been shoved to the back and compost the food that is truly bad.
Call In a Collection Agency
If your city or municipality’s weekly composting drop-off services have been suspended due to COVID-19, see if there are any compost pickup services that will collect your scraps. While they might charge you, ask your neighbours to go in on a composting service and split the costs.
Give Your Plants a Boost
Instead of composting or tossing your coffee grounds, sprinkle old ones around your plants, working the old grounds into the soil. The grounds can help keep slugs and other plant pests away.
Plant in Your Eggshells
If you’re a lover of plants and gardening, try keeping eggshells to start new seedlings.
Eggshells can act as cups for seedlings and provide a safe and semi-porous environment in which your plants will thrive. When you’re ready to plant, add a scoop of potting soil to each eggshell, drop in your seeds, cover lightly and let them sprout!
What to Do With Compost

The time it takes for compost to finish depends on the size of your compost pile and the method you used. The best way to determine if it’s ready for use is by looking for the following characteristics.
- Texture: The texture of your compost should be crumbly and smooth. So, there shouldn’t be any recognizable materials like peelings or leaves.
- Smell: Your compost should smell like a forest on a wet day. Any traces of sour odours might mean that your compost needs more time.
- Colour: Your compost should be a dark rich colour, similar to dirt or coffee.
When mature, your compost pile will be reduced to one-third of its original amount. Using compost before it’s ready can attract pests and damage your plants. Below are a few ways to use your finished compost whether you’re interested in homesteading.
Use Your Compost as Mulch
Mulching is not only an easy way to apply compost to balcony planter boxes, but it also keeps down weeds and helps your soil retain moisture. Spread the compost in a thick (three to six-inch) layer on exposed soil.
Replenish the Soil in Your Potted Plants
Another way to use compost in your apartment is to replenish the soil in potted plants. Adding compost can boost growth when potting new houseplants or transferring plants to larger pots. Mix with potting soil and/or peat moss for better absorption.
Make Compost Tea
Steeping your compost in a liquid emulsion is one way to concentrate the nutrients because it makes them easier to absorb.
Donate
If you want to help but lack a green thumb, donate your finished compost to a local farm, community garden, school or business that might be interested in using it.
Urban Composting Tips + FAQs
You don’t need a yard to compost. Instead, we’ve sourced urban composting tips and frequently asked questions about composting in an apartment.
Will Composting Make My Apartment Smell?
A properly balanced compost pile should not smell bad. Using too many greens (nitrogen material), too little aeration, too much moisture, and not mixing well can cause a compost pile to smell bad. Because of this, you can read up on tips for ensuring your compost bin won’t smell.
How Do You Compost in an Apartment Without Worms?
The easiest way to compost indoors is to use a worm bin, but not everyone is up to storing worms under their sink. You can set up an indoor composting system without worms, but it takes some monitoring and attention to do so successfully.
First, you’ll need a storage container and lid, such as a 37.85 litre or 68.13-litre plastic storage bin. Drill aeration holes in the lid of your bin, add your compost contents and start composting.
Tips for composting without worms:
- Add shredded paper every time you add food scraps. This will provide carbon to your compost and prevent it from getting too soggy.
- Turn and churn your compost regularly. This helps create microbial activity and reduces any wet or dry pockets.
- Chop veggies, fruit and newspaper into small pieces. The smaller the pieces, the faster they’ll break down.
We’ve provided a few resources below for composting without worms:
- How To Make Your Own Indoor Compost Bin
- How To Compost In An Apartment Without Worms
- The How-To Compost Guide for City Dwellers
Where Can I Store My Compost?
If you live in an apartment, store compost bins in a closet, beneath your kitchen sink or next to your household trash and recycling bins. If you do this, it should keep the compost out of the way and safe from external factors and temperatures.
Resources for storing compost:
As you can see, there is more to composting than worms and dirt. Reducing your food waste by learning how to compost in an apartment is a great way to spend extra time at home by doing something good for the planet. To find your dream apartment and begin these activities yourself, explore our apartment listings in cities like Vancouver and more!